A mangle conversion. The universal printing press?
Graham Smith © 2003
A slightly edited version is published in the Autumn (September) issue of Printmaking Today
With a modest outlay combined with a little ingenuity and effort, you could be the owner of a converted mangle press that prints from relief blocks, intaglio plates and litho plates.
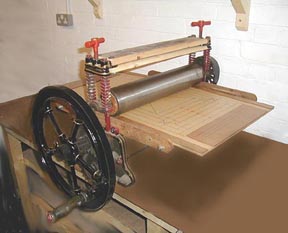
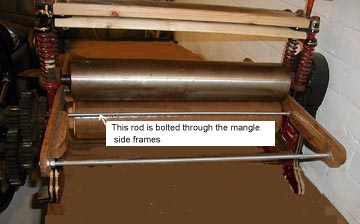
If you haven't already got a mangle then the first job is obvious, find one. There are a few variations available. Some of the early ones have a wishbone spring with a single pressure adjuster in the centre. Others have independent coil springs with adjusters on each side of the machine and quite often, the ability to fold down and convert into a table surface. The preferable type is the one, shown in the photograph, with independant coil springs. It was originally on a cast iron stand and the top could be folded down by releasing a lever and winding the handle. It also has independent springs on each side. I could have left the mangle on its stand and immobilized the fold down action. However, I preferred to make a bench mounted model.
Once you have acquired a mangle the most expensive outlay will be the cost of sheathing the wooden rollers in steel. The sheathing will provide the rollers with a surface that has the accuracy necessary to aquire a uniformity of pressure for printing. It is most unlikely that the old wooden rollers will be accurate enough to use for printing. I was lucky enough to have a friend who had some spare tubes left over from a previous sheathing job which he had done for somebody else. There was also access to a lathe to turn down the wooden rollers and true the steel after fitting.
Rollers
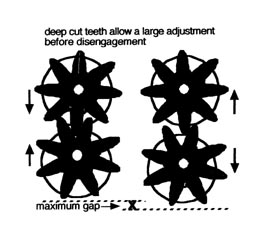
The wooden rollers have a spindle running through the center and protruding from both ends. One end runs in an oiled bush. The other end has a gear wheel for driving the roller. Mangles had to cope with a variety of cloth thickness passed through them and therefore the gear wheels have very deep cut teeth that allows the top roller to lift away from the bottom one without becoming disengaged. This is an advantage when converting, as you don't have to work to highly accurate tolerances. The rollers are removed by releasing the top plate, the springs, washers etc to enable the rollers to be lifted upwards. Make a note of how it comes apart to aid reassembly.
As a general rule, have the wooden rollers covered with metal cylinders that have, as near as possible, the same outside diameter as the original wood. This will mean that the wood will have to be turned down on a lathe in order to fit the cylinders. The wall of the metal cylinders does not need to be excessively thick. My rollers have metal with a wall thickness of 0.25 inches. Any small jobbing engineering shop will be capable of doing the work.
Relief Printing
Relief printing presses were all originally presses used for printing type and the most common press is the albion which uses downward pressure. The printers type, or block, sits on the bed and pressure is applied by the platten above. The other type of printers press is a roll-over press which has a cast iron bed and a roller that passes across the block to apply the pressure. These presses were used by commercial printers to make proof prints by hand. The distance between the roller and the bed was set to take 'type high' blocks and pressure applied by the roller was only adjustable by packing up the block. The mangle conversion is different to both of these. It is more comparable with an etching press as the rollers are in a fixed position and the bed moves between the rollers. The other notable difference, for relief printing, is that the block is much shallower than the 'type high' block. An unmounted linocut is the ideal thickness for printing.
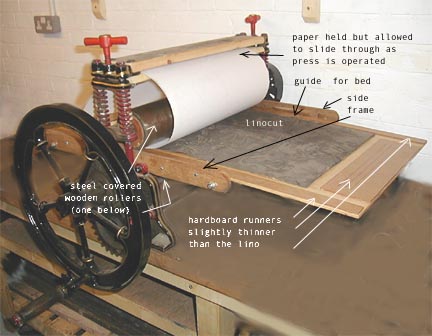
The one disadvantage with using a roller pressure for relief printing is that the paper stretches as it passes through the rollers. Because of this, the paper cannot be laid flat onto the inked block and then passed through the press. This would result in a double image being printed as the paper gradually moves due to the stretching action as the press is operated. The simple remedy is to nip the leading edge of the paper and hold it away from the inked block as the press is operated. This can be done by hand or a method of holding the paper can be used, like the one I made, shown in the photograph and drawing. This same technique also applies to the printers 'rollover' press.
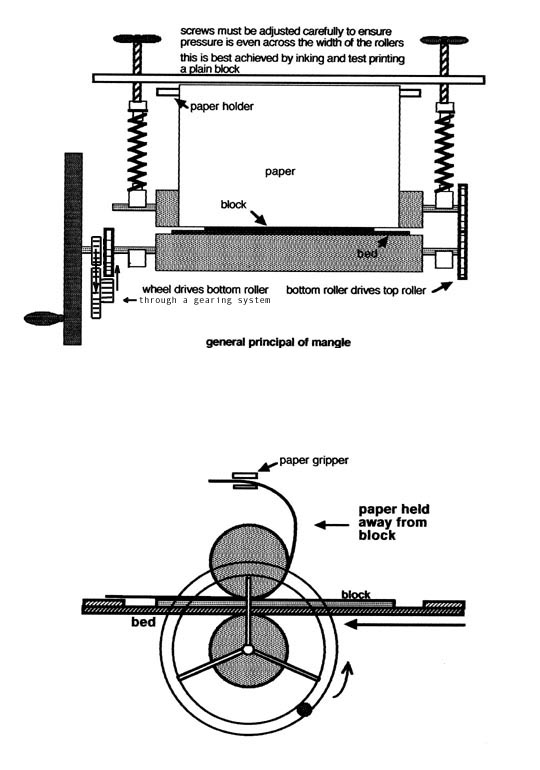
As mentioned earlier, the mangle was designed to take a variety of cloth thickness through the rollers. This is the reason for incorporating adjustable springs. This can be advantageous to printmakers as it allows us to use a different thickness of printing block as long as we keep within the limits of the gear wheels and insert suitable side runners (shown in the photographs and drawings). Failure to insert side runners will cause the top roller to jam against the leading edge of the printing block causing it to move out of register. The springs must be adjusted evenly otherwise the top roller will tilt and apply eneven pressure on the block. This uneven pressure can also cause the paper to distort and crease as it passes through the rollers. A dry run without ink is a good starting point to test how the paper runs. Then run off some proofs with inexpensive paper.
If you intend to use the press with a standardized height of block at all times it may be better to substitute the springs with steel tubes accurately cut to the same length as the springs. Pressure adjustment can still be made using the top screws. This is a refinement that I have not yet tried.
Intaglio
If you intend to use a mangle press for printing from intaglio plates you will certainly need to make the modification mentioned above concerning replacing the springs with steel tubes. Intaglio printing requires a much stronger pressure than relief printing and the build of the mangle's framework may need to be strengthened to avoid any distortion that would cause uneven pressure across the roller surfaces. However, if you compare a mangle with an etching press you can see that by adding a steel bed with runners you have a very similar looking machine.
The bed
a) Releif Printing - for this type of printing a bed made from a piece of 6mm MDF is quite suitable. The material is very smooth, has an accurate uniform thickness, resists compression well and is quite stable as long as it is kept dry. Its also inexpensive. Make the bed long enough to take your longest print size making sure the paper will release from the rollers with the bed still gripped by them. Stick runners along the outside edges of the bed to give a gap between the rollers. For linocuts, strips of hardboard are ideal. In any case, make sure that the runners are slightly thinner than the printing block. You will also need two more strips of the same thickness, one placed at each end of the bed. These end strips will act as paper grips allowing the roller to nip the leading edge of the paper. Having one at each end will save rewinding the press back after each print. Also, on the bed, draw two diagonals and a grid, in felt tip. This will ensure that you caneasily center the block on the bed. On the strips at the ends of the bed, draw a few parallel lines that can be used for lining up the top edge of the paper. The easiest way to do this is to lay an accurate sheet of printing paper on the bed as a template and check that it runs parallel with the sides of the bed before marking the top edge.
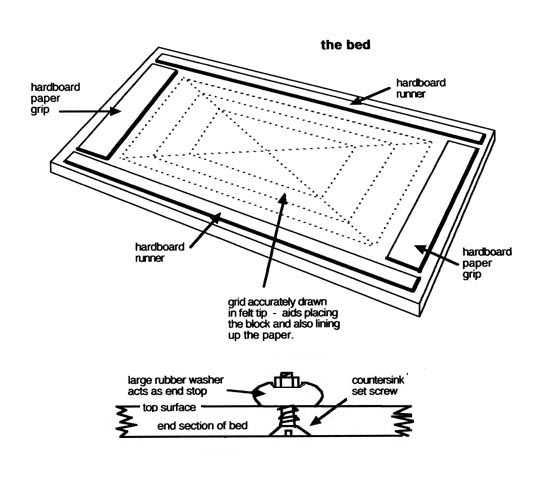
b) intaglio - for this type of printing it is probably advisable to purchase a piece of steel quarter plate cut to size. There are different grades of steel plate and you can buy it with a ground surface for extreme accuracy. However, this should not be necessary a piece of rolled steel should do the job. The only modification needed on the plate is the addition of end stops to stop the bed from being wound out of the rollers. Drill the ends - countersink the holes on the top of the plate - insert a machine screw and fit a thick nylon washer and nut underneath. Having the countersunk head on the bottom surface will ensure that the bed passes over the bed supports.
c) lithography printing - either type of bed (MDF or steel) should be suitable for printing litho plates. However, if you use the bed set up for relief printing you will need to pack up the plate to ensure that it is above the level of the side runners.
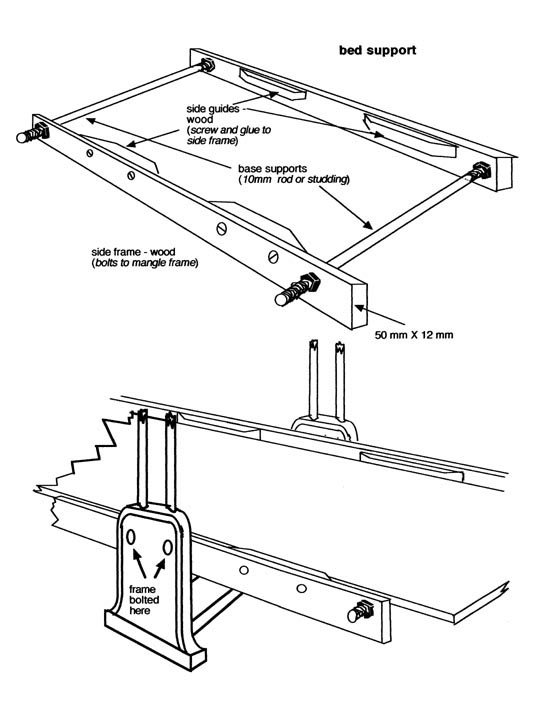
The bed support
The bed support has two functions. The first being to hold the bed horizontally and the second being to guide the bed laterally. Wood can be used for most of this structure as the pressures applied are minimal and the criteria for mangle conversion is low cost and the ability to make most of the parts yourself. The side frame pieces should be about three quarters the length of the bed and once made, should first be bolted to the mangle side frame. Position these pieces so that their center line matches with the point where the two rollers meet. The length of the base support rods can then be determined. These should be made from steel rod or alternatively, to dispense with thread cutting, studding which can be purchased from any DIY and is threaded along its whole length. Once cut, determine the position for fitting these rods. The base support rods can be fitted and locked into position with nuts and washers either side of the side frame pieces. These metal supports for the bed should be positioned with a clearance of about 5 mm between their top surface and the base of the bed. The final addition to the bed support frame is that of adding side guides. These again can be made of wood with tapers at each end. The side edges of the bed will run against them and a small clearance should be allowed for free movement.
General printing - The press will be suitable for general printing using a variety of techniques to produce monoprints. However, remember that the rollers give a pressure that would push ink forward if the ink was too thick. To alleviate this affect, keep the pressure to a minimum that allows a satisfactory result.
Interchangeable beds can also extend the variety of print methods so it could prove useful to make more than one.
Multicolor printing - Printing single colour prints is very straightforward as the registration of the block to the paper does not need to be that accurate. However, the printing of more than one colour will require more detailed attention to the registration process. Paper registration is best achieve by the method used in screen printing. Cut some small strips of card and stick them, using double sided tape, to the hardboard paper gripping surface adjacent to the top edge and one corner of the paper. As an added precaution to stop the paper from slipping, apply masking tape to the top edge of the paper after registering.
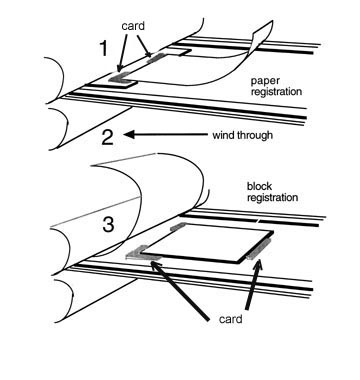
Some thicker card strips can be used to register the block. Again, the top and one corner but with an extra piece at the bottom end of the block to avoid slipping when the mangle is operated. Slipping could occur if the hardboard runners are too thin in comparison with the block thickness, i.e.. This would cause too deep a step at the leading edge of the block and the roller would push the block forward. A good tip is to hold the block firmly with one finger, if possible, as the rollers take up onto the leading edge. Once the rollers have passed completely across you can rewind backwards giving the block two passes. In any case,carry out some test prints with one pass and two passes before deciding on your method.
Printing - The amount of pressure will determine the quality of the print. This should be the minimum pressure needed to acquire a satisfactory result. Even pressure across the block is acquired by equal tension of the springs on either side of the mangle. Unequal pressure will also cause the paper to distort and in extreme cases crease. With the un-inked block inserted, loosen the spring adjusters and turn them down a few turns. You can then ink up the block and try a proof print. Register and nip the paper between the rollers before placing the inked block on the bed. The paper holder modification shown in the diagram above will hold the paper clear from the bed while the block is placed. Once a satisfactory print has been obtained, mark the spring adjusters, or preferably count the number of turns needed to obtain the pressure and keep a note. After the final printing session, release the spring pressure.